You might have heard the name "Hemmings" before, perhaps in connection with classic cars or vehicles that have a bit of history to them. Well, that's one kind of Hemmings, and it's pretty neat, truly. But today, we are talking about a completely different kind of "hemming," one that has nothing to do with four wheels and everything to do with getting those baseball pants to fit just right, you know, for the ball field. This kind of hemming is about making sure your player can run, slide, and catch without tripping over extra fabric, which is a big deal, actually.
When someone steps onto the baseball diamond, whether they are a little kid just starting out or a seasoned player, their gear really needs to be on point. Pants that are too long can be a real nuisance, causing trips or just getting in the way of a smooth stride. It's a common thing, so many baseball pants come with extra length, giving folks the chance to make them just the right size for whoever is wearing them. This simple adjustment can make a world of difference in how a player feels and moves during a game, and that's pretty important, too it's almost.
So, if you have ever wondered about making those long baseball pants shorter, or if you are getting ready to do it for the first time, this little guide is for you. We will go over what you need, how to figure out the best length, and the steps to get it done, even if you are not a sewing expert, which is great, naturally. It's about helping your player feel comfortable and ready to play their best, and that's what we are here to talk about, as a matter of fact.
Table of Contents
- Why bother with hemming baseball pants?
- What tools do you need for hemming baseball pants?
- Getting the length just right for hemming baseball pants
- The actual process of hemming baseball pants
- Tips for a clean finish when hemming baseball pants
- Keeping your hemming baseball pants work looking good
Why bother with hemming baseball pants?
You might be thinking, why go through the trouble of changing the length of baseball pants? Well, there are a few really good reasons, actually. First off, safety comes to mind. Pants that drag on the ground can easily get caught under a player's cleats, leading to a trip or a fall, and nobody wants that, right? A player needs to move freely, without any extra fabric getting in the way of their feet, so that's a big one, you know.
Then there's the look of things. When pants are the correct length, they just appear more put together. It gives a player a more professional appearance on the field, which can make them feel more confident, too it's almost. It's about presenting oneself well, and that includes the uniform fitting properly. A neat uniform can make a player feel ready to play, and that is definitely a good thing, as a matter of fact.
Comfort is another big piece of the puzzle when it comes to hemming baseball pants. When pants are too long, they can bunch up around the ankles, which can feel annoying and uncomfortable. This can distract a player from the game, and we certainly do not want that. Pants that fit well allow for a full range of motion, letting the player run, slide, and throw without feeling restricted. It is about making sure the player can focus on the game, and that is what really counts, in a way.
Also, keeping the pants in good shape is a consideration. When the bottom edges drag on the ground, they can get dirty, torn, or frayed very quickly. This means the pants might not last as long as they should, and replacing them often can be a bit of a bother. A proper hem keeps the fabric off the ground, helping the pants stay clean and undamaged for a longer period of time, which is pretty sensible, you know. So, really, there are many good reasons to take the time to adjust the length.
What tools do you need for hemming baseball pants?
Before you get started with changing the length of those baseball pants, it is helpful to gather a few basic items. You do not need a fancy sewing studio, just some simple things you might already have around the house, which is pretty convenient, you know. First, you will want a good measuring tape. This is for figuring out just how much length to take off, and getting that measurement right is key, as a matter of fact.
Next, you will need something to mark the fabric. A piece of tailor's chalk works well, or even a regular pencil if the fabric is light enough for the mark to show up. The idea is to make a clear line where you plan to cut or fold, so that is pretty important, too it's almost. You also will want a pair of sharp scissors, the kind that can cut fabric cleanly. Dull scissors can make the job harder and leave ragged edges, and nobody wants that, right?
For the actual sewing part, you will need a needle and some thread. Choose thread that matches the color of the pants as closely as possible, so the stitches blend in. If you are using a sewing machine, make sure it is threaded and ready to go. A sewing machine makes the job quicker, but hand sewing is perfectly fine too, it just takes a little more time, in a way. You might also want some pins to hold the fabric in place while you work, which can make things much easier, honestly.
Finally, an iron and an ironing board will be very helpful. Ironing helps to create crisp folds and makes the hem look much tidier. It also helps to set the fabric before you sew, which can prevent things from shifting around, you know. So, with these few things ready, you will be well-prepared to start the process of hemming baseball pants, and it will make the whole thing go much more smoothly, definitely.
Getting the length just right for hemming baseball pants
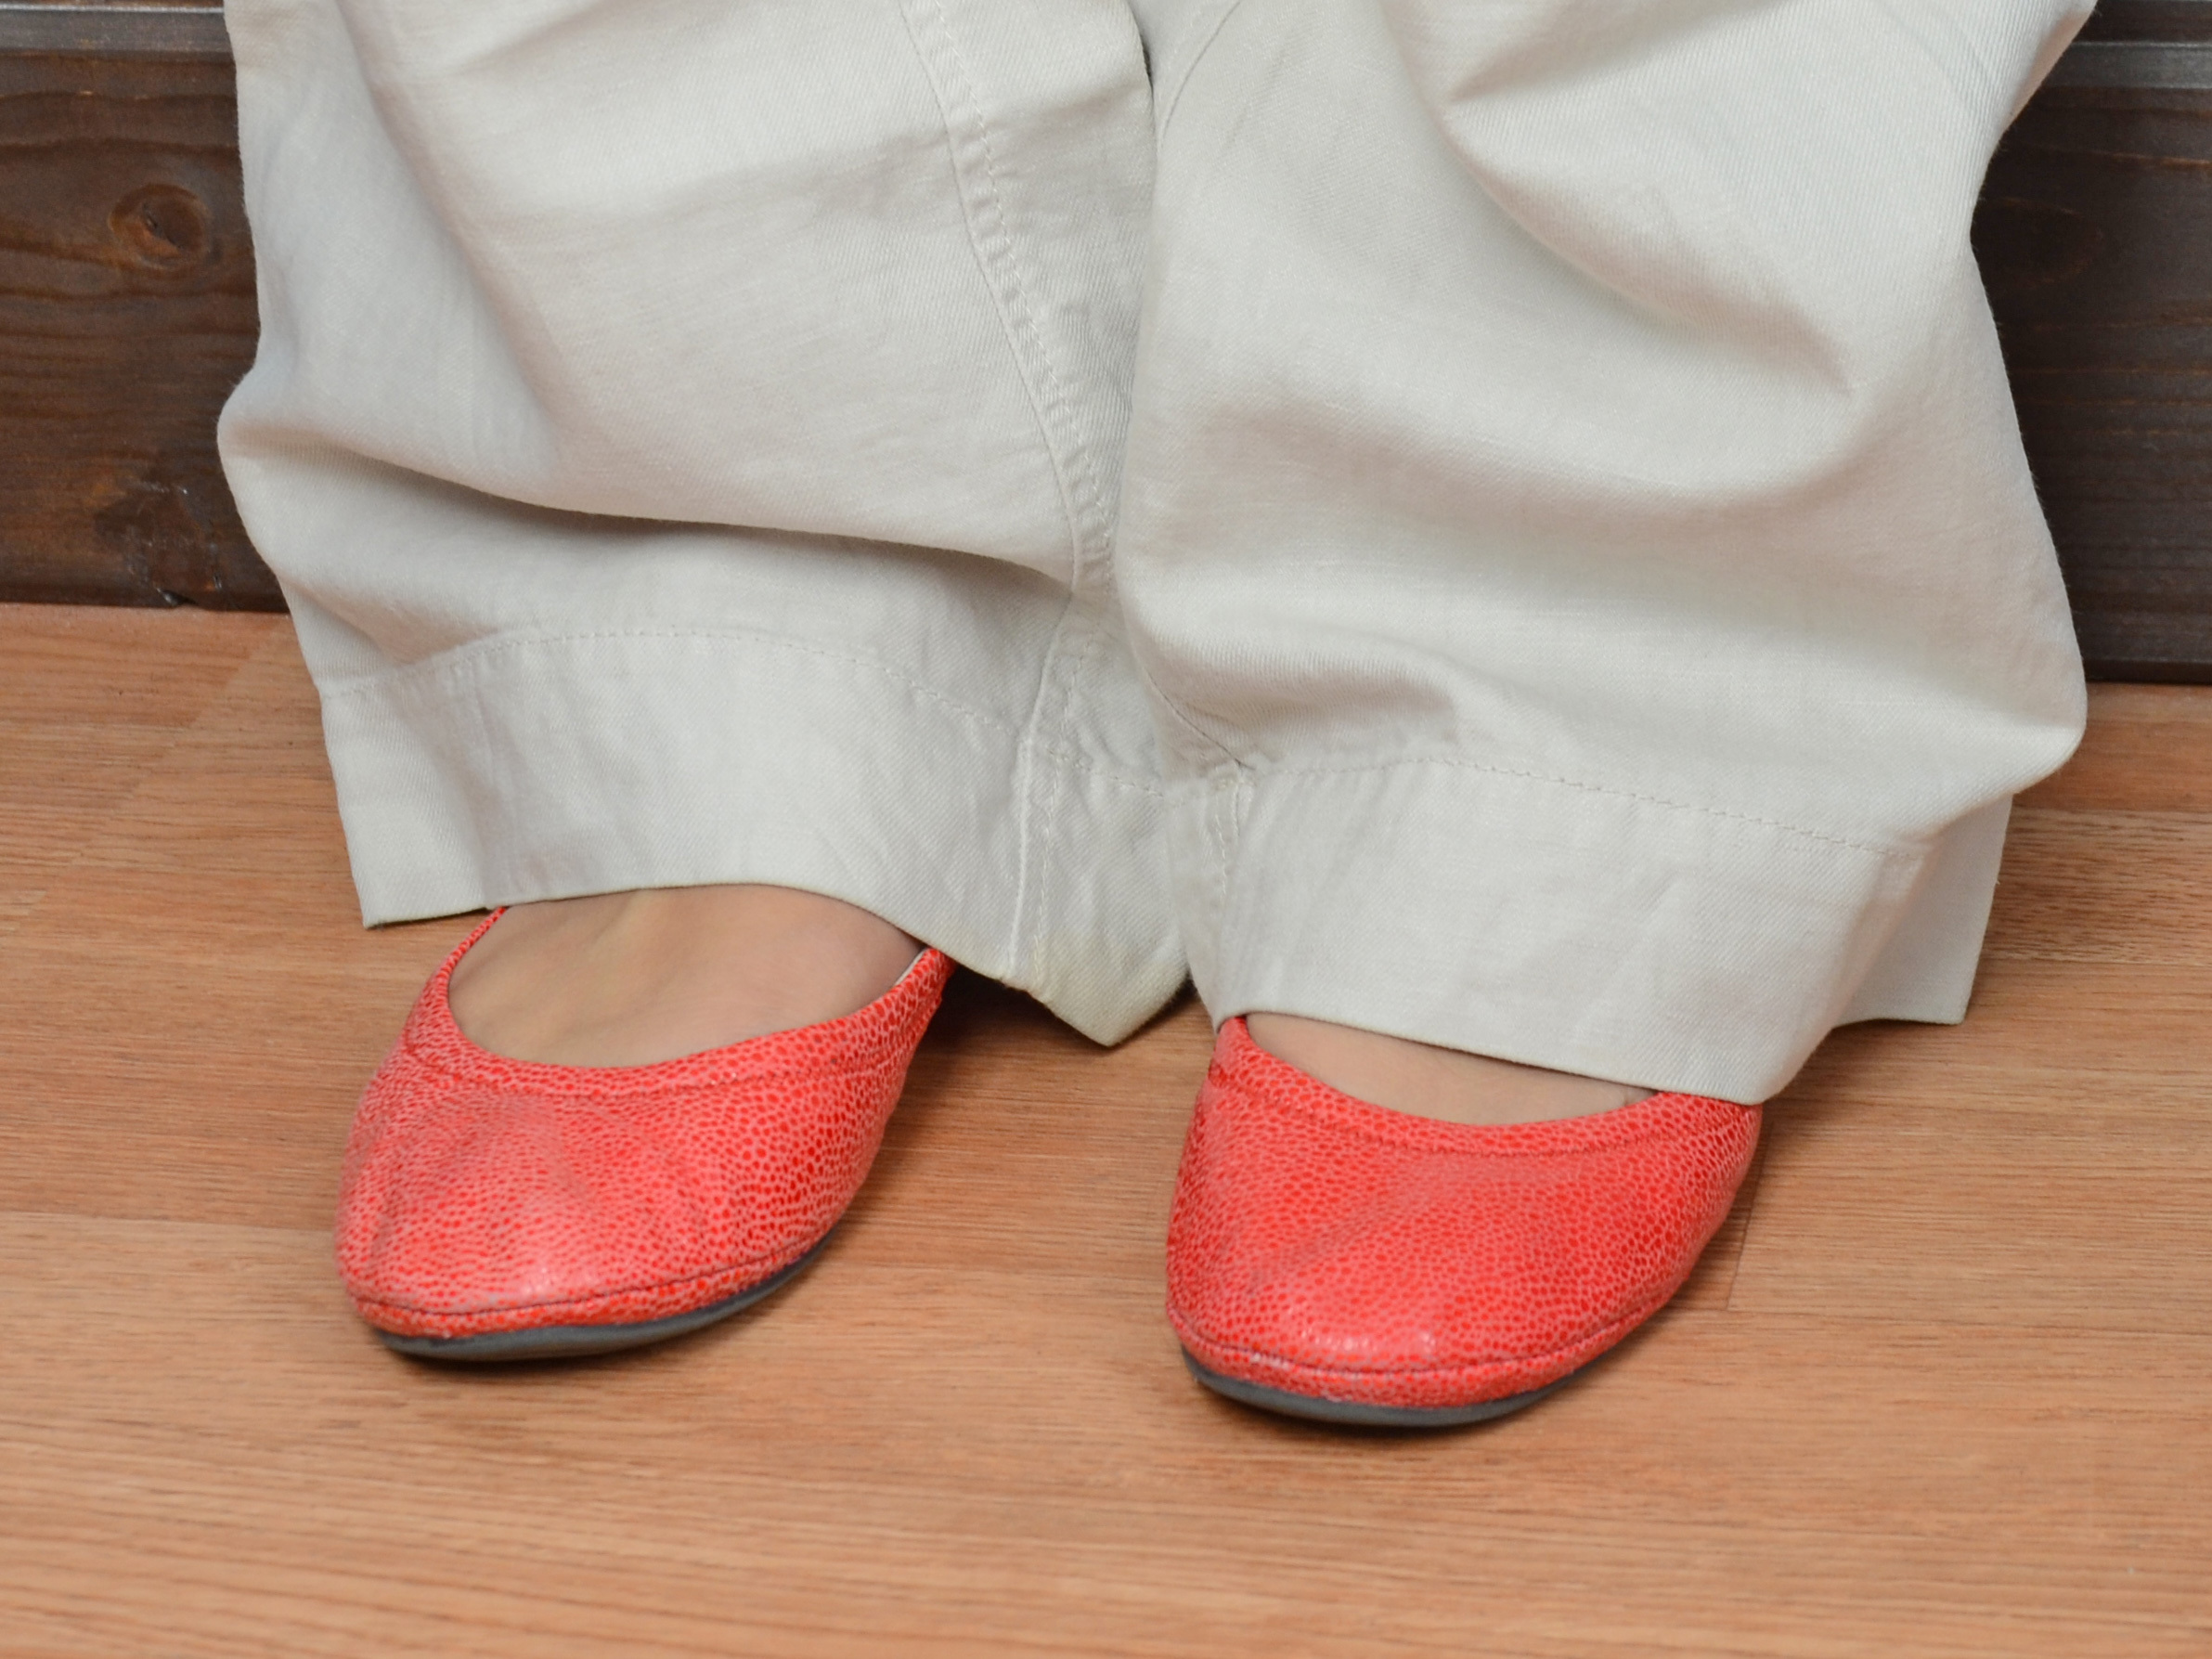
Figuring out the perfect length for baseball pants is a step that really matters. It is not just about cutting off some fabric; it is about making sure the pants fit the player in a way that helps them perform, you know. The best way to measure is to have the player put on their baseball cleats. This is important because cleats add a little bit of height, and that can change where the pants sit on the foot, so that is a big consideration, too it's almost.
Have the player stand up straight, with their weight evenly distributed. You want them to stand as they would naturally on the field. Then, you will need to decide on the style of hem. Some players like their pants to just barely touch the top of their cleats, which is a pretty classic look. Others prefer them a little shorter, perhaps just above the ankle, to show off their stirrups or socks, which is also a common choice, as a matter of fact.
Once you have decided on the style, use your measuring tape to find the spot where you want the bottom of the pants to fall. Hold the measuring tape straight down from the waist, or have the player hold it, if that is easier. Make sure the tape is not twisted, and get a clear reading of the length. This measurement will be your guide for where the new hem will be, and getting it accurate here will save you trouble later, you know.
Remember to consider how much fabric you will need to turn up for the hem itself. Typically, you will want about an inch or two for the hem allowance. So, if you want the finished hem to be, say, 30 inches long, you might need to cut the fabric at 32 inches to allow for the fold. It is always a good idea to measure twice and cut once, just to be sure, and that is a pretty good rule to follow, anyway.
How do you mark the perfect spot for hemming baseball pants?
Once you have decided on the desired length, the next step is to mark the pants accurately. This is where your tailor's chalk or pencil comes in handy. With the player still wearing the pants and their cleats, stand next to them and mark a line all the way around the leg at the chosen length, you know. Make sure this line is even and straight, parallel to the floor, which is pretty important, too it's almost. You can do this by having the player stand on a flat surface and measuring up from the floor, or by using a ruler to keep your mark consistent.
After you have made that first mark, you will need to add a bit more for the hem allowance. This is the fabric that will be folded up and sewn to create the finished hem. A good rule of thumb is to add about 1.5 to 2 inches below your initial mark. So, if your desired finished length is at 30 inches, and you want a 1.5-inch hem, you would mark your cutting line at 31.5 inches from the top, which makes sense, right?
Draw a second, clear line for your cutting guide. This second line is where you will actually cut the fabric. It is very important to make this line precise, as this is where you will make the actual cut. You might want to use a ruler to ensure this line is perfectly straight all the way around the pant leg. This will help you get a nice, even hem when you are done, and that is what we are aiming for, as a matter of fact.
Before you make any cuts, it is a really good idea to double-check your measurements. Have the player move around a little bit, maybe bend their knees or take a step, just to see how the pants hang. Sometimes, a slight adjustment might be needed based on how they move. Taking this extra moment can save you from cutting too short, which is something you definitely want to avoid when hemming baseball pants, basically.
The actual process of hemming baseball pants
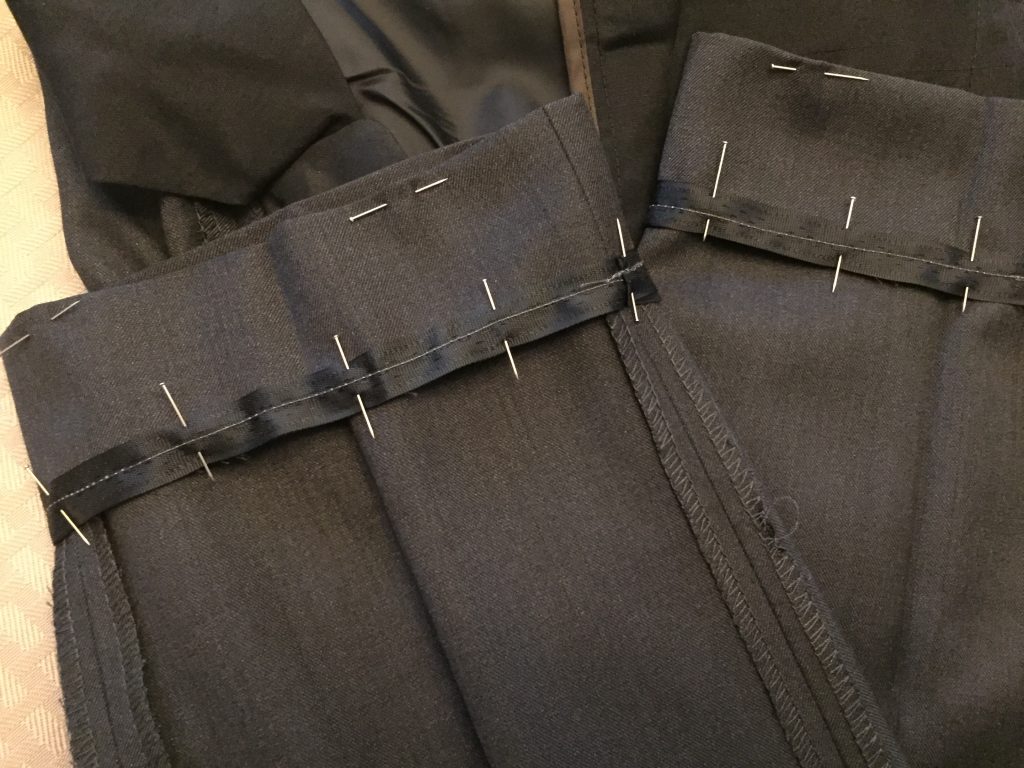
Now that your pants are marked and ready, it is time for the actual hemming. First, lay the pants flat on a clean, open surface, like an ironing board or a large table. Using your sharp scissors, carefully cut along the lower marking line you made. Take your time with this step to ensure a straight and even cut. A clean cut here will make the rest of the process much easier, you know, and that is pretty helpful, too it's almost.
Once the excess fabric is removed, you will prepare the raw edge. Turn the cut edge up by about a quarter of an inch, or just a little more, and press it flat with your iron. This first small fold helps to hide the raw edge of the fabric, giving the hem a much neater appearance. Use pins to hold this fold in place as you go around the pant leg, which can make it stay put, as a matter of fact.
Next, fold the hem up again, this time to the full desired hem allowance. So, if you planned for a 1.5-inch hem, you would fold it up another 1.25 inches (after the initial 0.25-inch fold). Press this second fold firmly with the iron. This creates the main hem. Again, use pins to secure this fold all the way around the pant leg, making sure the hem is even in width all the way around, which is pretty important, honestly.
Now, you are ready to sew. If you are using a sewing machine, select a straight stitch and sew close to the top folded edge of the hem. Go slowly and carefully, making sure your stitches are even. If you are hand sewing, use a simple running stitch or a blind hem stitch, which hides most of the thread. The goal is to secure the hem firmly so it does not come undone during play. Make sure to backstitch at the beginning and end if using a machine, or tie off your threads securely if hand sewing, and that is pretty much it, you know, for the main part of hemming baseball pants.
What if you don't want to sew when hemming baseball pants?
Not everyone enjoys sewing, and that is perfectly fine. Luckily, there are some great no-sew options available for hemming baseball pants that can still give you a clean, lasting result. One of the most popular choices is iron-on hem tape, which is also sometimes called fusible web. This tape has a special adhesive that melts when heated, creating a bond between two pieces of fabric, you know. It is a pretty simple way to get the job done, too it's almost.
To use iron-on hem tape, you would follow many of the same initial steps as with sewing. First, measure and cut the pants to the correct length, remembering to leave that hem allowance. Then, fold up the hem to the desired width, just as you would for a sewn hem. Press this fold with an iron to create a crisp crease, which is pretty helpful, as a matter of fact. This helps the hem stay put while you work, obviously.
Next, unroll the iron-on hem tape and place it inside the folded hem, right along the raw edge. Make sure the tape is completely inside the fold and not sticking out anywhere. You might need to cut the tape to fit the circumference of the pant leg. Once the tape is in place, fold the hem back up over the tape. Then, use a hot iron to press firmly along the hem. The heat will activate the adhesive, bonding the hem in place, and that is pretty much it, you know.
It is a good idea to hold the iron in place for a few seconds on each section, following the instructions on the hem tape package. Allow the hem to cool completely before handling the pants too much, as this gives the adhesive time to set properly. This method is a quick and easy way to get a neat hem without needing a needle and thread, which is great for those who prefer not to sew, definitely. It works very well for hemming baseball pants.
Tips for a clean finish when hemming baseball pants
Getting a hem to look really good often comes down to a few small things that make a big difference. One of the most important tips is to use your iron often. Pressing the fabric at each step – after cutting, after the first fold, and after the second fold – creates crisp, clean lines. This makes it much easier to sew or bond the hem evenly, and it gives the finished product a very polished appearance, you know, which is pretty nice, too it's almost.
Another helpful idea is to use plenty of pins. When you are folding up the hem, place pins every few inches around the pant leg. This keeps the fabric from shifting as you work, ensuring that your hem stays the same width all the way around. Removing the pins just before your needle reaches them while sewing can prevent them from getting in the way, and that is a good practice, as a matter of fact.
When you are sewing, whether by hand or machine, try to keep your stitches straight and even. If you are using a machine, guide the fabric carefully and do not pull or push it too hard. If you are hand sewing, try to make your stitches consistent in size and spacing. Even stitches look better and hold the hem more securely, which is pretty important for pants that will see a lot of action, obviously.
Finally, after you have finished sewing or bonding the hem, give the entire hem a final good press with the iron. This helps to set the stitches or the adhesive and gives the hem a really professional look. It also helps to smooth out any slight puckering that might have happened during the sewing process. Taking these extra steps can really make your hemming baseball pants project look like it was done by a pro, and that is a great feeling, you know.
Keeping your hemming baseball pants work looking good
Once you have put in the effort to get those baseball pants just right, you will want to make sure your hard work lasts. Taking good care of the hemmed pants can help them stay in great shape for many games to come. When it comes to washing, it is usually a good idea to follow the care instructions on the pant's label. Most baseball pants can go in the washing machine, but cold water is often better for keeping colors bright and preventing shrinkage, you know, which is pretty helpful, too it's almost.
If you used an iron-on hem tape, it is especially important to check the specific care instructions for that product. Some hem tapes might recommend a certain wash temperature or advise against using a dryer on a very high heat setting. High heat can sometimes weaken the adhesive bond, causing the hem to come undone over time, and nobody wants that after all your effort, right? So, being mindful of the heat is a pretty good idea, as a matter of fact.
For pants with a sewn hem, they are generally quite durable. However, if you notice any loose threads or stitches, it is a good idea to snip them off or reinforce them quickly. Catching a small issue early can prevent it from becoming a bigger problem later on, like the hem starting to unravel. A quick repair can save you from having to re-do the whole hem, which is pretty convenient, obviously.
When drying the pants, air drying or using a low heat setting in the dryer is often a good choice. This can help preserve the fabric and the hem. If you hang the pants to dry, make sure they are hung in a way that does not stretch the hem out of shape. Keeping the hem flat and smooth during drying can help it maintain its neat appearance, and that is what we are aiming for, you know, when it comes to hemming baseball pants.